How to Start a Substack: A Step-by-Step Guide to Your First Newsletter
Learn how to start a Substack newsletter in 8 steps: account setup, niche selection, first post, growing subscribers, and enabling paid subscriptions.
Updated 11 min read
Learn how to start a Substack newsletter in 8 steps: account setup, niche selection, first post, growing subscribers, and enabling paid subscriptions.
Starting a Substack takes about 15 minutes from signup to your first published post, using Substack's built-in email, blog, and social features at no upfront cost. The platform has 50 million monthly active subscribers and 5 million paid subscriptions as of 2025, making it the largest dedicated newsletter platform for independent writers. It is not just a publishing tool: it handles your email list, payments, discovery, and hosting in one place.
Whether you are a first-time writer or migrating from another tool, this guide walks you through every step to set up, publish, and start growing your Substack.
Follow these 8 steps to start a Substack, whether you are launching from scratch or bringing an existing audience with you.
Before you start, make sure you have:
Go to Substack.com and click "Start writing." Sign up with your email address or Google account.
You will be prompted to enter your name, write a short bio, and upload a profile photo. Use your full name, or the name people recognize you by online if you use a pseudonym. A complete profile increases your discoverability in Substack's Explore page and search results.
Tip: Write your bio in the second person from the reader's perspective: "I cover X for Y." It signals immediately who the newsletter is for.
Once your account is created, Substack walks you through setting up your first publication. You will need three things:
Publication name. A good name captures the topic in a few words and is easy to say aloud. Test it by imagining you are on a podcast: is it memorable, short, and easy to spell?
The On Substack guide offers examples like Heated ("A newsletter for people who are pissed off about the climate crisis") and Platformer ("News at the intersection of Silicon Valley and democracy"). Many successful newsletters simply use the writer's name.
Publication URL. All Substacks get a yourname.substack.com URL by default. You can set a custom domain later (covered in Step 4). Using keywords in your URL can improve discoverability in Google search.
One-line description. This appears below your publication name and in subscriber recommendation emails. Its goal is to tell your target reader exactly why they should subscribe. Keep it specific: "Weekly lessons on bootstrapped SaaS from a solo founder" converts better than "Thoughts on business."
Tip: Do not stress about getting the name or URL perfect. You can change both later, and many successful publications have pivoted their branding after launch.
A clearly defined topic is the most important strategic decision you will make before your first post. It does not need to be narrow to the point of excluding readers, but it does need a direction.
Start with this sentence: "I write about [X] for [Y] so they can [Z]." This is not a promise for life; it is a starting point. A working example: "I write about Python automation for marketing managers so they can save 10 hours a week."
Writer and educator Dickie Bush, who has built multiple newsletters totaling over 100,000 subscribers, recommends positioning yourself as "the Category Newsletter" for a defined topic segment. Readers and the Recommendations algorithm respond better to a crisp identity than to a general one.
Specialized niches also outperform generalist content when it comes to paid conversion. The typical paid subscriber pays $6-$9 per month, and they pay because the content is specific enough to be irreplaceable.
After setup, go to the Settings tab on your dashboard and complete these sections before publishing your first post.
Publication details:
About page. This is the first thing many visitors read before deciding to subscribe. Write what you cover, who it is for, how often you publish, and what a subscriber gets. Skip the autobiography and lead with the reader's benefit.
Import existing content. If you have posts on Medium or WordPress (via RSS), you can import them directly. If you have an email list on another platform, upload it as a CSV under Settings → Subscribers → Import.
Custom domain (optional). You can connect a domain you own to remove "substack" from your URL. Go to Settings → Publication details → Custom domain and follow the DNS instructions. It costs nothing on Substack's end; you only pay for the domain registration itself (typically $10-$20/year).
Tip: Complete the About page before you invite anyone to subscribe. It is the conversion page for every new visitor who clicks on your newsletter from a recommendation or search result.
From your dashboard, click the "+" button and select "Post." The Substack editor is a rich-text interface that supports images, embeds (YouTube, X/Twitter, Spotify), code blocks, and a paywall marker.
What to publish first. Your first post should introduce yourself, explain what the newsletter will cover, and set expectations for publishing frequency. Do not wait for it to be perfect. A clear, honest "this is who I am and what I'm building here" post converts better than a carefully polished piece that took three weeks to write.
Sending options. You can send a post to all subscribers (free), to paid subscribers only, or schedule it for a future date and time. You can also publish to the web only, without emailing anyone, which is useful for evergreen pages you want indexed.
Preview before sending. Use the preview button to see exactly how your email will render in a subscriber's inbox before it goes out.
Tip: At the bottom of your first post, add a call to action. Ask readers to share the newsletter with one person who would find it valuable. Word-of-mouth from your first 10 subscribers drives more growth than most paid tactics in the early stage.
Substack makes enabling paid subscriptions a one-click process, but timing matters. Most creators in the Substack community recommend building a free audience of at least 100-500 subscribers before turning on paid, so you have enough readers to convert.
When you are ready, work through these four steps:
Substack takes 10% of paid revenue, and Stripe takes approximately 2.9% + $0.30 per transaction. The remaining ~87% goes directly to you.
You do not need to paywall everything. Many successful newsletters keep most content free and gate only bonus material, deep dives, or a weekly thread. The free content builds trust; the paid content monetizes it.
Tip: Consider offering a free trial before asking for payment. Substack supports 30-day free trials for paid tiers, which significantly improves conversion for readers who are on the fence.
Substack Notes is a short-form social feed built into the platform, similar to X/Twitter. Notes appear to your subscribers and can be discovered by anyone browsing the Explore feed. It is the most overlooked feature by beginners in 2026.
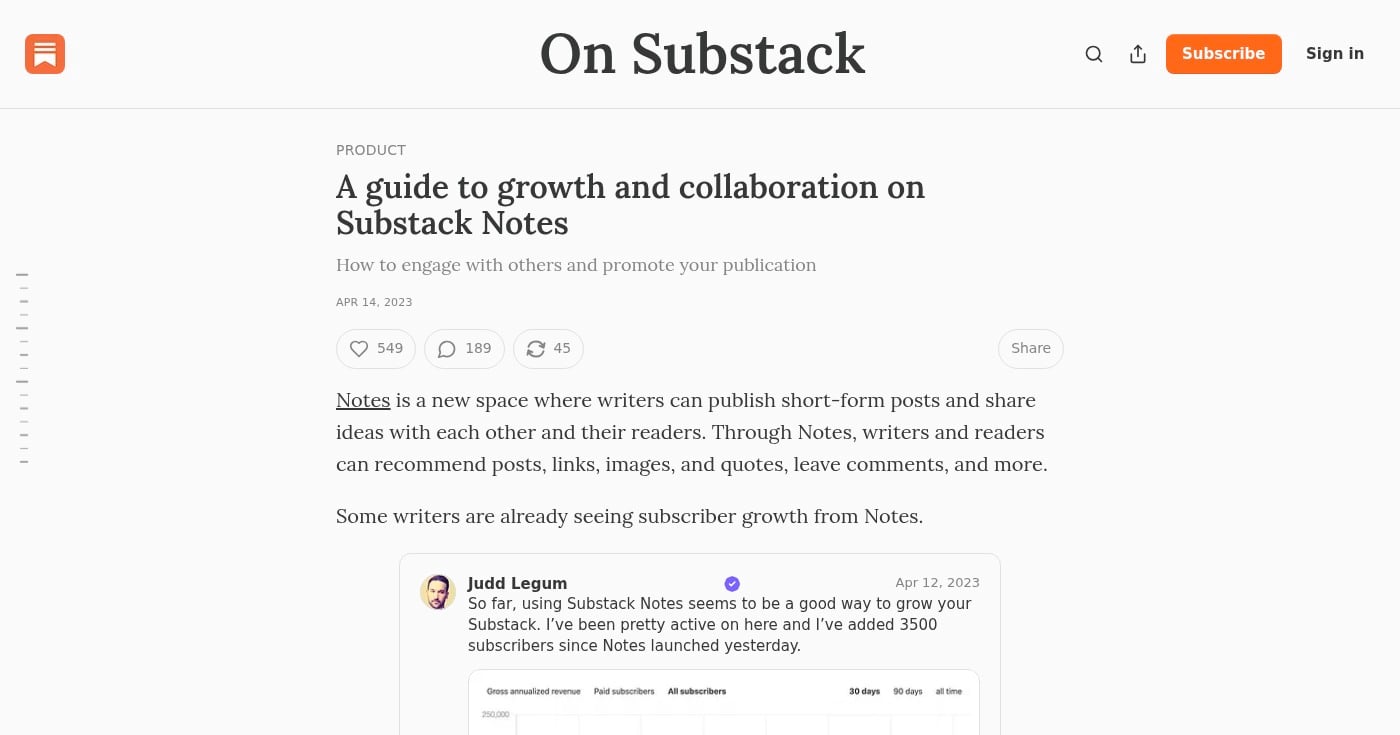
Substack's own growth research shows that Notes is the primary in-platform discovery engine, surfacing active Notes posters to new readers and making it a zero-cost organic growth channel that compounds with time.
How to use Notes effectively:
Notes also feeds into the Recommendations engine. When other writers in your niche engage with your content, their audiences see your work and can subscribe directly.
Tip: Think of Notes as your in-platform distribution engine. Your newsletter delivers to people who already subscribed. Notes helps people who have never heard of you find you.
Growing a Substack audience in 2026 combines platform-native tools and external promotion. The Recommendations feature lets writers cross-promote each other's newsletters, sending targeted notifications to each other's full subscriber base at no cost.
Within Substack:
Outside Substack:
Import and invite:
The first 100 subscribers are the hardest. Creators who grow fast typically combine consistent publishing (weekly is the most sustainable cadence), active Notes engagement, and at least one external channel. By 2026, Substack has ~1.8 million active creators, and the ones who build audiences fastest treat it as a platform-first social network, not just an email tool.
Tool | Best For | Pricing | Free Plan |
|---|---|---|---|
All-in-one newsletter, email, and social publishing | Free (10% of paid revenue) | Yes | |
Advanced analytics and ad network (migration option) | From $42/mo | Yes | |
Email sequences and automation for newsletters | From $25/mo | Yes | |
Creating branded logos and cover photos for your publication | From $15/mo | Yes | |
Cross-posting Substack content to X and LinkedIn | From $19/mo | Yes |
Cause: You selected "Web only" instead of "Email + Web" in the send options.
Fix: Go to the post editor, click the send settings at the top right. Make sure "Send as email" is toggled on before publishing.
Cause: DNS propagation takes 24-72 hours after you update your records. Substack also requires a specific CNAME record format.
Fix: Follow the exact custom domain instructions from Substack. Use a free DNS checker to verify the CNAME record has propagated before retrying the connection.
Cause: Your Stripe account is not fully verified, or you are in a country where Stripe does not yet support payouts.
Fix: Log in to your Stripe dashboard and complete any pending identity verification steps. Check Stripe's supported countries list for payout availability in your region.
Cause: Your publication does not have a complete About page or your description does not clearly explain who the newsletter is for.
Fix: Update your About page to answer: what you cover, who it is for, how often you publish, and what paid subscribers get. Add a clear call to action at the top.
Cause: Over-reliance on passive discovery. New newsletters rarely grow from search alone.
Fix: Activate Substack Notes (post daily for 30 days), engage in your niche's comment sections, and set up at least one Recommendation exchange with a writer in an adjacent topic.
Starting a Substack requires no technical setup, no upfront cost, and no existing audience. The steps are straightforward: create your account, define your niche, configure your settings, write your first post, and use Notes to grow inside the platform.
Once you have your first few posts live, consider exploring related resources on how to grow a newsletter audience, or how to write a welcome sequence that converts new subscribers into engaged readers.
Learn how to publish a book on Kindle in 11 steps: from account setup and formatting to pricing, royalties, and going live on Amazon KDP in 72 hours.

Learn what sentence variety is, why it matters for reader engagement, and how to use length, structure, and opening patterns to fix monotonous prose.
A writing style guide is a documented set of rules that tells your team how to write. This guide covers which foundation guide to choose, the nine components every style guide needs, a 10-step build process, and the enforcement problem that derails most guides after launch.
Professional publishing supported by generous companies you should check out.